


Knowing Google Search Console
If you have a website and you have not already registered with Google Search Console, it’s time for you to do so and start profiting from this free Google tool. In this tutorial we will see step by step the different functions of this tool and how to analyze the data to make improvements recommended by Google.
What is Google Search Console for?
Google Search Console is a basic tool for anyone working in a digital environment, SEO, Webmasters and programmers can rely on this official Google tool. When we mention that it is an official tool it is because it is the same Google that is sending us information about the current status of our website, it provides us with reports on possible problems that are affecting performance and correct them immediately. If you already have experience with some other type of tools like Screaming Frog or SemRush, the information offered by the console may not be as detailed, but we mention again: Google Search Console comes from Google itself, why not take advantage of it?
The main function Search Console is to warn of possible problems, errors in tracking, penalties and all those errors that are affecting the performance and positioning of our projects.
What information can Search Console send me?
At the moment we will highlight some, later we can see the rest of the information that this tool gives us through reports:
- Know how Google values the current state of our website.
- Performance reports and queries.
- Detect faults that are detracting from the value of web positioning.
- Check that the entire status of our website is correct.
Starting to use Google Search Console
Next we’ll see what you need to do to use GSC and apply it to your projects.
First, we need to have a Google Account or create an exclusive to sign up.
To access Google Search Console it can be a Gmail or Analitycs account. We‘re logged into our account and we’ll be accessing Google Search Console
Starting to use Google Search Console
Once you have log into our account, we search for the name of the tool on Google, we go in and done, we are already inside, we can also enter directly here: https://search.google.com/search-console/about?hl
Add a website
Already with our Search Console account what we should do to add our websites, we click “Add Property” in the top left corner and we should see this screen:
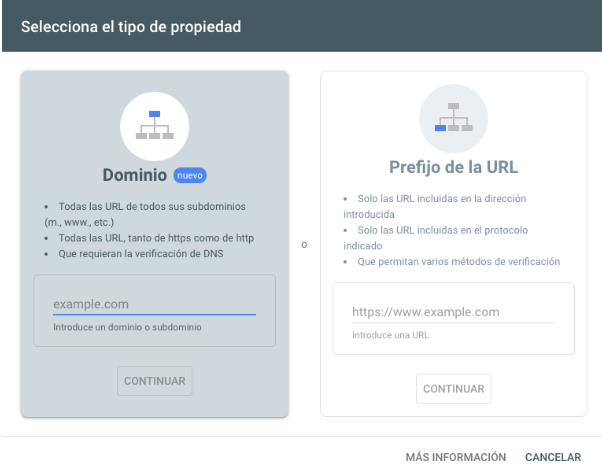 We recommend doing so in “URL Prefix” we enter the URL of our site and give continue. We are shown the following options, from downloading an HTML file and uploading it to the website, to other options such as HTML tags, even registering with Google Analytics (for this we obviously have to be registered with Google Analytics beforehand) .We advise you to do so with the HTML tag method, because it is more practical.
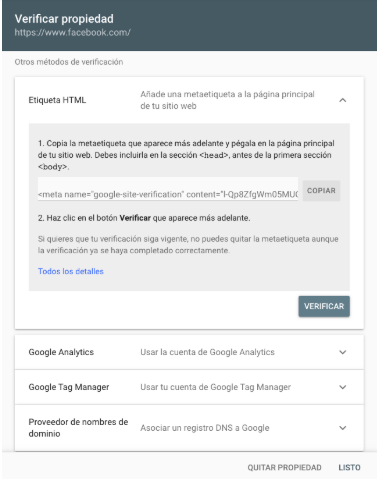 We choose the “HTML Tag” option and click on the “COPY” button and paste the generated tag on the home page of our website. We must include it in the section <head> before the first section <body>, we can order this to the person who develops our site or do it ourselves manually by entering the code to our homepage, since we did this we give in verify and ready, we already have verified our site within Google Search Console.</body></head>
Sending the Sitemap from the website
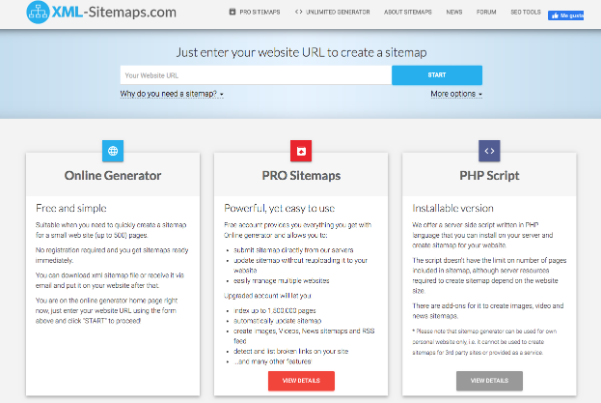
Taking advantage of the fact that we already have verified the website, we can take the opportunity to send the site sitemap to Google. It is important to mention that this step is not necessary but by good practice it is better to do it at once. The reason is that in this way we give Google a notice that we have a site that we want to track and index all pages so that it can display them in their search results, the sitemap functions as a map that allows search engine spiders to directly track all the pages we want to index.Why? Because it’s about making it easy for Google to crawl and index your website pages so you can show them in their search results. If we work with WordPress we can easily generate this sitemap with Plugins like Yoast SEo or Google XML Sitemaps. Another simple way to do this is by going into https://www.xml-sitemaps.com/
Within this page we copy the website URL and press start to generate a site map. We wait for the sitemap to be ready (it may take a few minutes)
 When you are ready we download the created sitemap and upload it to the root folder of our site:
Since we upload the file we go to Then open Google Search console and add your sitemap URL, this will take us to Google Search Console, we search for the sitemap section and there we enter the URL of the site map: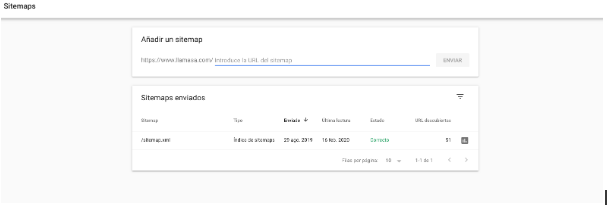
We need to complete the URL by typing sitemap.xml and done, we click the submit button to complete the process. Registration may vary in one or two days, after which Google will start sending us data.
Knowing The Google Search Console Dashboard.
Now let’s take a closer look at the functions that this tool brings.
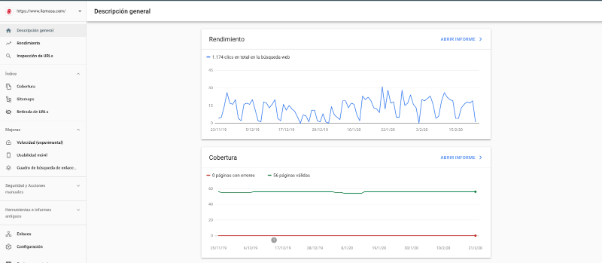
Overview
Here we will find three main reports: Performance, Coverage and Better. In performance we will see general statistics of the clicks that our website has had in a certain period of time, by default it is the last three months. This report is presented as a linear graph where we can give an idea of the performance that our organic positioning had, compared to the queries made in the search engine and the times that users clicked on the links to our page: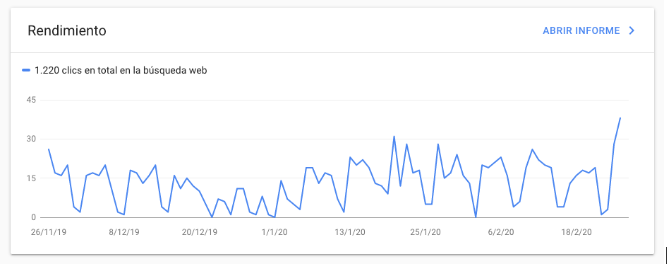
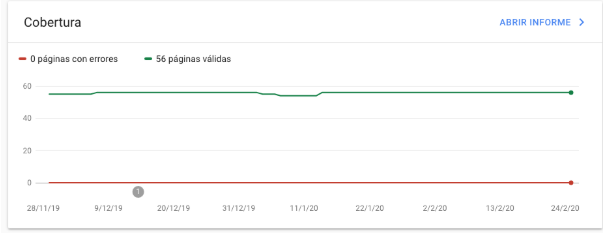
Coverage:
This report shows the indexing status of all URLs you have visited or attempted to visit the Google robot on your own. That is, it is used to check which pages Google has indexed, which ones have errors or warnings, and how you can have them included in the index.
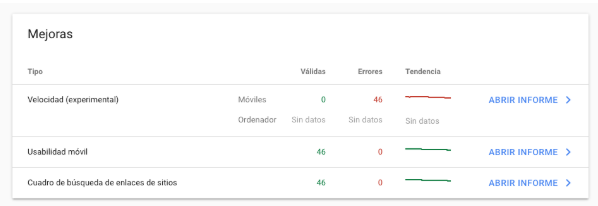
Improvements:
Here we can see a history of improvements made to the website by URL, such as mobile usability or links to sites. Recently the speed report was added, this one is in the experimental phase but it is good to keep that in mind.
Performance Report in detail:
From the previous reports we can see data in greater depth.In the performance report for example, we can see not only the clicks of our website, but data such as impressions, ctr and average position. Here are if we can set performance dates and compare the performance of our website by comparing previous months. For example if the previous month our ctr was greater than the current month then we should analyze the possible causes: position changes, user response to that query, whether the titles and goals are correctly optimized, etc. 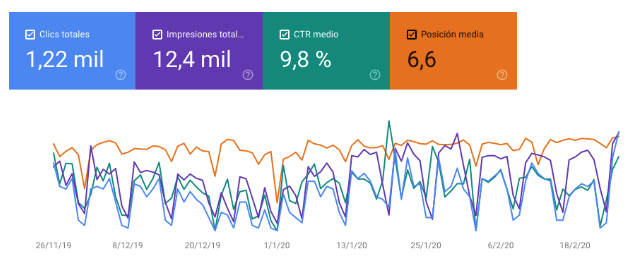
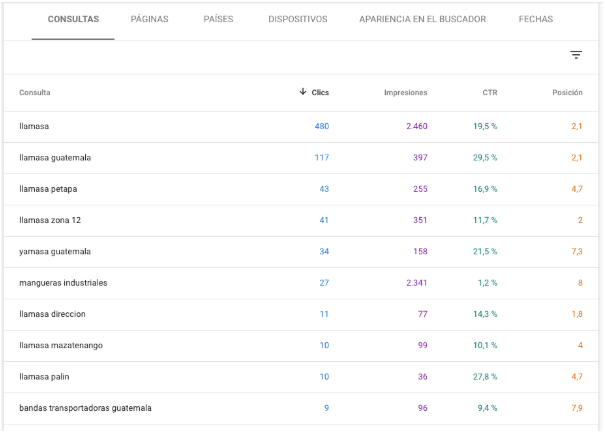
Something quite valuable that this report offers us is the “queries”, which are the search terms (keywords) that users are doing on a specific topic and that are bringing traffic to our website. This allows us to better understand how our target group is interested and how we are responding to those searches. For example, if we have a website that sells electricity accessories, and we see that one of the queries made by users is “device to measure static electricity” we can analyze in what position we have that query, to reinforce with some article within our blog that explains in detail the devices that we have for sale, or see if that keyword we have within our category pages. This makes organic positions go up quite a bit and we offer a better experience to users when they visit our website.
URL inspection
In this section we can check the status of a particular URL within the property we have registered and are analyzing.
 For example we have our www.examplesite.com and we want to analyze the status of the URL www.examplesite.com/onlinestore we enter it in the search bar to get the data from Google. At the end of the analysis Google present us a report like this:
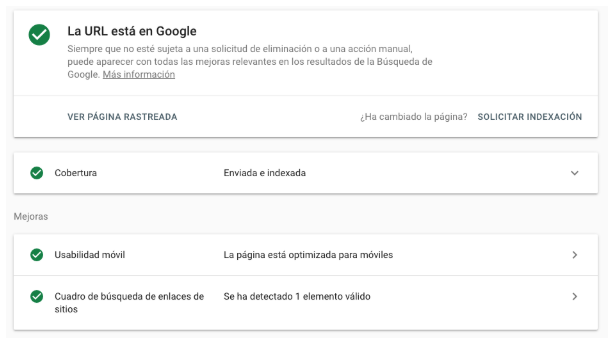
Where we can see if the URL is indexed, if it is mobile-friendly or the external links that the URL we request to analyze has.In the “Index” section we can see in detail the coverage report mentioned above:
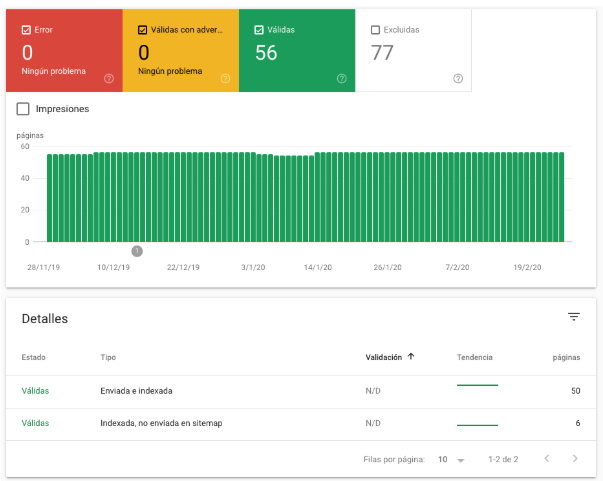 elps us to know if we have pages within the website with any indexing issues, improvement warnings, pages that are valid for search engines and those that we decided to exclude from Google results.
Sitemaps:
The sitemaps we’ve submitted before, the status you’re in, also allow us to submit new sitemaps (there are different types of sitemaps)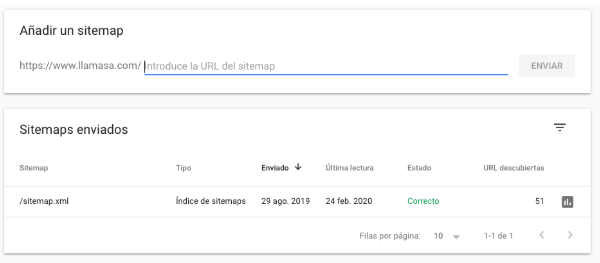
Withdrawal of URLs
Here we can ask Google not to display any URLs on your website, it may be for several factors that we don’t want these pages to appear in Google results.These URLs will disappear from search engines but not from our website.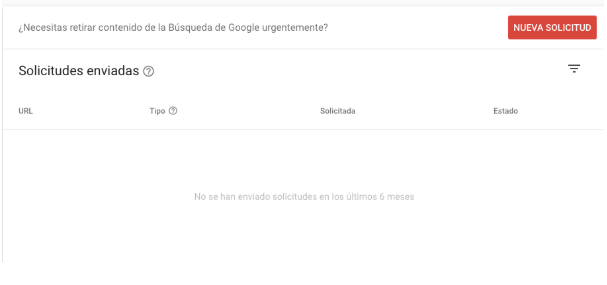 There are more features within the platform, which are for more advanced SEO work, such as links or search box, the important thing is that you un altae your website in Google Search Console and get acquainted with this tool, to know how Google is viewing your site and apply the necessary improvements to improve your positioning on Google.We hope you will find this tutorial very useful to know in a general way this free and official tool from Google.

SEO at Studio Plaza. Fan of Club Comunicaciones and The Rolling Stones. My crush is Eugenia Cooney. Sometimes I write.
No Comments